Pepper で撮影した画像を Face API を使って顔認識をしてみる話
こんにちは、ソリューション開発部の柴崎です。
Microsoft Cognitive Services の Face API を使った顔認識を調べましたのでご紹介します。今回は、事前に顔写真を登録した人が指定の写真に含まれているかを、Pepper が撮影した顔写真を使って Face API に問い合わせます。さらに、正しく識別できた場合は BLOB に顔写真をアップロードするシナリオとします。
Face API を使うには、あらかじめ Azure にて Cognitive Services APIs の新規作成が必要です。新規に作成すると、キーが発行されます。以降の Ocp-Apim-Subscription-Key リクエストヘッダの値には、このキーを使います。
Face API の種類
大きく分けて、学習のために画像や人・グループを登録する API と学習したモデルを使った処理を行う API があります。
学習のための API
Face List
今回のシナリオでは使わないので省略します。永続化した顔写真をひとまとめにするものです。後述の学習したモデルを使う Face のうち Find Similar で利用されます。
Person
1人につき複数の顔写真を登録できます。顔写真は永続化されます。今回主に使う API は以下の2つです。
Person Group
1グループにつき複数の人を登録できます。学習の単位がこの Person Group となります。今回主に使う API は以下の2つです。
学習したモデルを使う API
Face
指定の写真から実際に顔を認識します。今回主に使う API は以下の2つです。
実際に試してみる
今回は、ある写真に含まれる人が、あらかじめ登録してある人にどれくらい近いかを識別する必要があります。
学習のために画像や人・グループを登録する
顔を識別する前に、事前に学習が必要となります。ここでは、学習に必要な人や顔写真の登録を行います。
グループの作成
curl -X PUT https://api.projectoxford.ai/face/v1.0/persongroups/foo_group \
     -H 'Content-Type: application/json' \
     -H 'Ocp-Apim-Subscription-Key: ********************************' \
     -d '{"name":"Foo グループ","userData":"Foo グループです。"}'
作成できた場合は 200 OK が返ってきます。以下のようにして内容を確認できます。
curl -X GET https://api.projectoxford.ai/face/v1.0/persongroups/foo_group \
     -H 'Ocp-Apim-Subscription-Key: ********************************'
以下のようなレスポンスが返されます。
{"personGroupId":"foo_group","name":"Foo グループ","userData":"Foo グループです。"}
人の追加
curl -X POST https://api.projectoxford.ai/face/v1.0/persongroups/foo_group/persons \
     -H 'Content-Type: application/json' \
     -H 'Ocp-Apim-Subscription-Key: ********************************' \
     -d '{"name":"白川一郎","userData":"ほげ"}'
それぞれ、以下のようなレスポンスが返されます。以降の API ではこの personId を利用します。必要な回数を繰り返してください。また、登録された人と personId が分かるように管理してください。
{"personId":"********-****-****-****-************"}
以下のようにして内容を確認できます。
curl -X GET https://api.projectoxford.ai/face/v1.0/persongroups/foo_group/persons \
     -H 'Ocp-Apim-Subscription-Key: ********************************'
以下のようなレスポンスが返されます。(フォーマットを整形しています)
[
  {
    "personId": "********-****-****-****-************",
    "persistedFaceIds": [],
    "name": "白川一郎",
    "userData": "ほげ"
  },
  {
    "personId": "********-****-****-****-************",
    "persistedFaceIds": [],
    "name": "青川四郎",
    "userData": "ほげら"
  },
  {
    "personId": "********-****-****-****-************",
    "persistedFaceIds": [],
    "name": "黄川五郎",
    "userData": "ほげほげ"
  },
  {
    "personId": "********-****-****-****-************",
    "persistedFaceIds": [],
    "name": "赤川三郎",
    "userData": "ぴよ"
  },
  {
    "personId": "********-****-****-****-************",
    "persistedFaceIds": [],
    "name": "黒川二郎",
    "userData": "ふが"
  }
]
登録された人の顔写真を登録する
以下の「{personId}」部分を先ほど登録した personId の値に置き換えて実行してください。一人に対して複数の顔写真を登録することができます。必要な回数を繰り返してください。
curl -X POST https://api.projectoxford.ai/face/v1.0/persongroups/foo_group/persons/{personId}/persistedFaces \
     -H 'Content-Type: application/octet-stream' \
     -H 'Ocp-Apim-Subscription-Key: ********************************' \
     --data-binary '@bar.jpg'
成功した場合は、以下のようなレスポンスが返されます。
{"persistedFaceId":"********-****-****-****-************"}
顔が認識できない画像であると、以下のようなエラーとなります。
{"error":{"code":"InvalidImage","message":"No face detected in the image."}}
以下のようにして内容を確認できます。
curl -X GET https://api.projectoxford.ai/face/v1.0/persongroups/foo_group/persons/{personId} \
     -H 'Ocp-Apim-Subscription-Key: ********************************'
以下のようなレスポンスが返されます。顔写真が3枚登録されていることが分かります。(フォーマットを整形しています)
{
  "personId": "********-****-****-****-************",
  "persistedFaceIds": [
    "********-****-****-****-************",
    "********-****-****-****-************",
    "********-****-****-****-************"
  ],
  "name": "白川一郎",
  "userData": "ほげ"
}
学習する
curl -X POST https://api.projectoxford.ai/face/v1.0/persongroups/foo_group/train \
     -H 'Ocp-Apim-Subscription-Key: ********************************' \
     -d ''
成功すると、202 Accepted が返ってきます。以下のようにして学習の状況を確認できます。
curl -X GET https://api.projectoxford.ai/face/v1.0/persongroups/foo_group/training \
     -H 'Ocp-Apim-Subscription-Key: ********************************'
以下のようなレスポンスが返ってきます。この例ではすでに学習が完了しています。(フォーマットを整形しています)
{
  "status": "succeeded",
  "createdDateTime": "12/1/2016 1:08:53 PM",
  "lastActionDateTime": "12/1/2016 1:08:54 PM",
  "message": null
}
以上で下準備が完了しました。もし顔写真を追加したり変更した場合は、再度学習が必要となります。
学習したモデルを使い実際に顔を識別する
さて、贅沢に Pepper をカメラとして使い撮影した人物の写真が識別されることを確認してみましょう。以下のソースような Python Script ボックスを作成します。変数も併せて作成してください。
- FaceApiKey
- FacePersonGroupId
- StorageName
- StorageAccessKey
- BlobBasePath
- ImageUrl
class MyClass(GeneratedClass):
    def __init__(self):
        GeneratedClass.__init__(self)

    def onLoad(self):
        self.frameManager = ALProxy('ALFrameManager')

    def onUnload(self):
        pass

    def onInput_onStart(self):
        import os

        # Detect
        local_file_path = os.path.join(
            self.frameManager.getBehaviorPath(self.behaviorId),
            '../html',
            self.getParameter('ImageUrl')
        )
        self.logger.info('ImageUrl=' + local_file_path)
        face_ids = self.__face_detect(local_file_path)
        self.logger.info('face_ids=' + str(face_ids))

        if face_ids:
            # Identify
            person_group_id = self.getParameter('FacePersonGroupId')
            self.logger.info('FacePersonGroupId=' + person_group_id)
            person_ids = self._face_identify(person_group_id, face_ids)
            self.logger.info('person_ids=' + str(person_ids))

            if person_ids:
                # Upload
                blob_path = '{0}/{1}.jpg'.format(
                    self.getParameter('BlobBasePath'),
                    '_'.join(person_ids)
                )
                self.logger.info('blob_path=' + blob_path)
                self.__storage_put(local_file_path, blob_path)

        self.onStopped()

    def __face_detect(self, data_file_path):
        u'''識別したすべての faceId のリストを返します。'''
        import json

        key = self.getParameter('FaceApiKey')
        data = open(data_file_path, 'r').read()

        res = self.__face_api(
            key, 'POST', 'detect', {'Content-Type': 'application/octet-stream'}, data
        )

        if res.code == 200:
          return [d['faceId'] for d in json.load(res)]
        else:
          return []

    def _face_identify(self, person_group_id, face_ids):
        u'''候補のすべての personId のリストを返します。'''
        import json

        key = self.getParameter('FaceApiKey')
        content = {
            'personGroupId': person_group_id,
            'faceIds': face_ids,
            'maxNumOfCandidatesReturned': 5
        }
        entity = json.dumps(content)

        res = self.__face_api(
            key, 'POST', 'identify', {'Content-Type': 'application/json'}, entity
        )
        if res.code == 200:
            return [candidate['personId'] for faces in json.load(res) for candidate in faces['candidates']]
        else:
            return []

        return json.load(res)

    def __face_api(self, key, method = 'GET', path = 'persongroups', headers = {}, content = ''):
        u'''Face API にアクセスします。'''
        import urllib2

        try:
            req = urllib2.Request(('https://api.projectoxford.ai/face/v1.0/' + path), content, headers)
            req.get_method = lambda: method
            req.add_header('Ocp-Apim-Subscription-Key', key)
            return urllib2.urlopen(req)
        except urllib2.HTTPError, e:
            self.logger.warn('{},\n{} {}\n{}\n{}\nresponse={}'.format(
                e, method, path, headers, content, e.read()
            ))
            return e

    def __storage_put(self, data_file_path, blob_path):
        u'''BLOB にファイルをアップロードします。'''
        account_name = self.getParameter('StorageName')
        data = open(data_file_path, 'r').read()

        res = self.__storage_api(
            account_name,
            self.getParameter('StorageAccessKey'),
            'PUT',
            blob_path,
            'image/jpeg',
            data
        )
        return res

    def __storage_api(self, account_name, key, method = 'GET', path = '', content_type = 'text/plain', content = ''):
        u'''Storage API にアクセスします。'''
        import urllib2,base64,hmac,hashlib,datetime

        content_md5 = base64.b64encode(hashlib.md5(content).digest())
        content_len = len(content)
        x_ms_date = datetime.datetime.utcnow()
        x_ms_blob_type = 'BlockBlob'
        x_ms_version = '2015-02-21'
        sign = '{}\n\n\n{}\n{}\n{}\n\n\n\n{}\n\n\nx-ms-blob-type:{}\nx-ms-date:{:%a, %d %b %Y %H:%M:%S GMT}\nx-ms-version:{}\n/{}/{}'.format(
            method,
            content_len,
            content_md5,
            content_type,
            '',
            x_ms_blob_type,
            x_ms_date,
            x_ms_version,
            account_name,
            path
        )
        signature = base64.encodestring(hmac.new(base64.decodestring(key), sign, hashlib.sha256).digest()).rstrip('\n')

        try:
            req = urllib2.Request('https://{}.blob.core.windows.net/{}'.format(account_name, path), content)
            req.get_method = lambda: method
            req.add_header("Authorization", 'SharedKey {}:{}'.format(account_name, signature))
            req.add_header("Content-Length", content_len)
            req.add_header("Content-MD5", content_md5)
            req.add_header("Content-Type", content_type)
            req.add_header("x-ms-blob-type", x_ms_blob_type)
            req.add_header("x-ms-date", '{:%a, %d %b %Y %H:%M:%S GMT}'.format(x_ms_date))
            req.add_header("x-ms-version", x_ms_version)
            return urllib2.urlopen(req)
        except urllib2.HTTPError, e:
            self.logger.warn('{},\n{} {}\n{}\nresponse={}'.format(
                e, method, path, content, e.read()
            ))
            return e

    def onInput_onStop(self):
        self.onUnload() #it is recommended to reuse the clean-up as the box is stopped
        self.onStopped() #activate the output of the box
実行してみましょう。撮影された写真がうまく識別されると BLOB ストレージにファイルが保存されます。
[INFO ] behavior.box :onInput_onStart:20 _Behavior__lastUploadedChoregrapheBehaviorbehavior_**********:/Detect Identify Upload_2: ImageUrl=/home/nao/.local/share/PackageManager/apps/.lastUploadedChoregrapheBehavior/behavior_1/../html/tookPic.jpg
[INFO ] behavior.box :onInput_onStart:27 _Behavior__lastUploadedChoregrapheBehaviorbehavior_**********:/Detect Identify Upload_2: FacePersonGroupId=foo_group
[INFO ] behavior.box :onInput_onStart:22 _Behavior__lastUploadedChoregrapheBehaviorbehavior_**********:/Detect Identify Upload_2: face_ids=[u'********-****-****-****-************']
[INFO ] behavior.box :onInput_onStart:37 _Behavior__lastUploadedChoregrapheBehaviorbehavior_**********:/Detect Identify Upload_2: blob_path=PATH/TO/BLOB/**************_********-****-****-****-************.jpg
[INFO ] behavior.box :onInput_onStart:29 _Behavior__lastUploadedChoregrapheBehaviorbehavior_**********:/Detect Identify Upload_2: person_ids=[u'********-****-****-****-************']
なぜかログの出力が前後してますが、うまく識別されたようです。
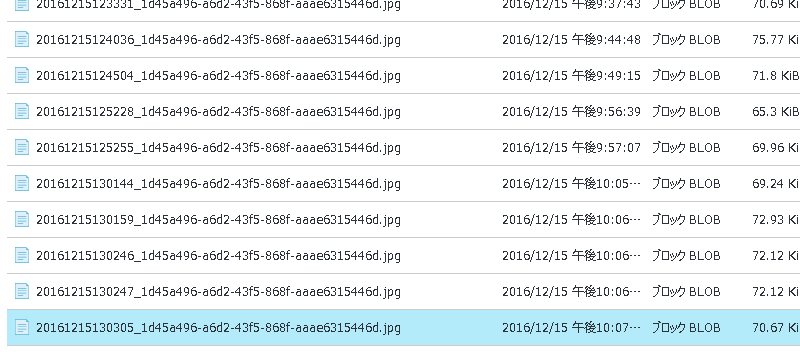
BLOB ストレージにアップロードされています。
まとめ
Pepper で撮影した写真でも人物を識別することができました。Pepper 単体でなく外部のサービスも利用することで可能性が広がります。今回利用した Face API の Identify 以外にも API はありますので他の API と組み合わせても面白いかと思います。ぜひ試してみてください。